SOAP Router Quickstart Tutorial
Help needed?
Do you need any help for this tutorial. Then contact us using the Membrane Google Group or send an email to membrane@predic8.com.
Synopsis
We will demonstrate how to setup Membrane Service Proxy as a SOAP proxy for the public SOAP Web service available at http://www.thomas-bayer.com/axis2/services/BLZService?wsdl. We show how the WSDL is rewritten by the proxy and how to add XML Schema validation to the proxy.
1. Get Started
Download Membrane Service Proxy version 3.5.1 or higher, unzip it and go to the extracted folder examples\quickstart-soap. Double click router.bat to start Membrane Service Proxy. Open the file proxies.xml and inspect the initial configuration you just activated:
<spring:beans xmlns="http://membrane-soa.org/proxies/1/"
	xmlns:spring="http://www.springframework.org/schema/beans"
	xmlns:xsi="http://www.w3.org/2001/XMLSchema-instance"
	xsi:schemaLocation="http://www.springframework.org/schema/beans http://www.springframework.org/schema/beans/spring-beans-3.0.xsd
					    http://membrane-soa.org/proxies/1/ http://membrane-soa.org/schemas/proxies-1.xsd">

	<router>

		<soapProxy port="2000" wsdl="http://www.thomas-bayer.com/axis2/services/BLZService?wsdl">
		</soapProxy>

		<serviceProxy port="9000">
			<basicAuthentication>
				<user name="admin" password="membrane" />
			</basicAuthentication>
			<adminConsole />
		</serviceProxy>

	</router>

</spring:beans>
Open the URL http://localhost:2000/axis2/services/BLZService in your Web browser. You will see the Web Service Explorer describing the Web Service with information automatically gathered from the WSDL:
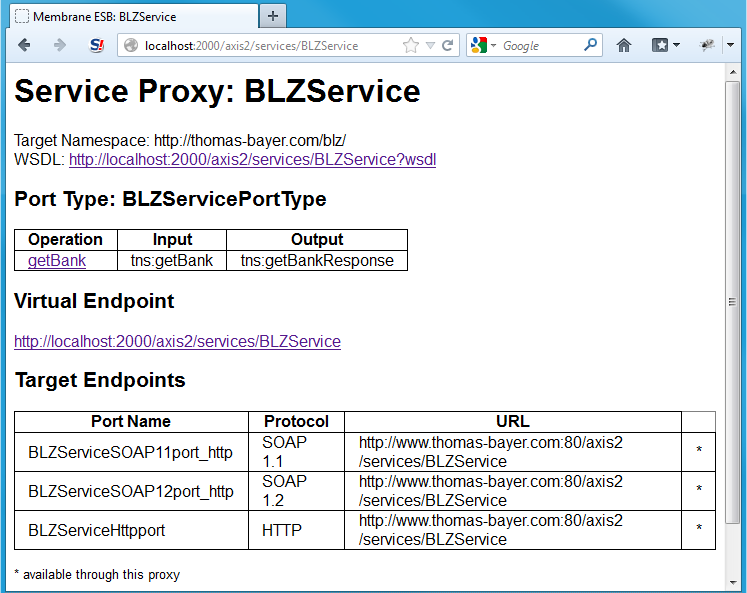
Figure1:
Note that the Name, Path and Target Endpoint have been extracted from the WSDL. The WSDL was retrieved at startup from the location you specified in the configuration file.
Now go back to the configuration file and add <path>/MyBLZService</path> to the <soapProxy>:
	<soapProxy port="2000" wsdl="http://www.thomas-bayer.com/axis2/services/BLZService?wsdl">
		<path>/MyBLZService</path>
	</soapProxy>
Save the configuration file. The changes will be picked up by Membrane almost immediately.
This change will cause the virtualized service to be available using the path /MyBLZService through the proxy (instead of the more technical /axis2/services/BLZService, which was automatically extracted from the WSDL).
Now re-open the Web Service Explorer at its new location (the old one will, of course, not work anymore) at http://localhost:2000/MyBLZService.

Figure2:
Note that the "Virtual Endpoint" is now /MyBLZService instead of /axis2/services/BLZService. (With this feature you can expose your Web Services at a central location with a constant public endpoint. When the underlying technology, host or endpoint changes, you can simply reconfigure your Membrane Service Proxy and your clients will keep working.)
Click on the link to the WSDL. Note that the endpoint URL at the very bottom has automatically been changed by Membrane. This causes SOAP requests from the client to be again passed through the proxy.
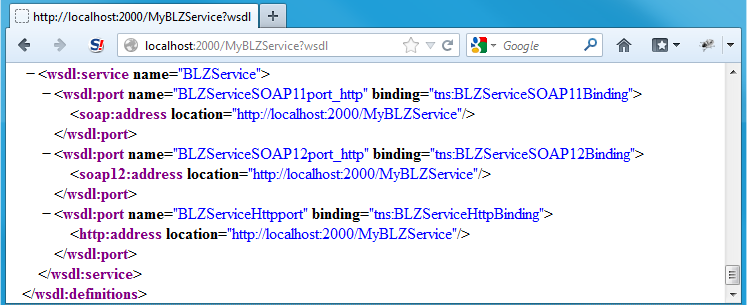
Figure3:
Congratulations! By requesting the WSDL, you have already completed your first proxied request! If you are interested in the underlying technologies, you can read more about URL Rewriting in WSDL and XML Schema.
2. Make your first proxied SOAP request
Now we will use soapUI as a real SOAP client. Install and start soapUI. Create new a project:
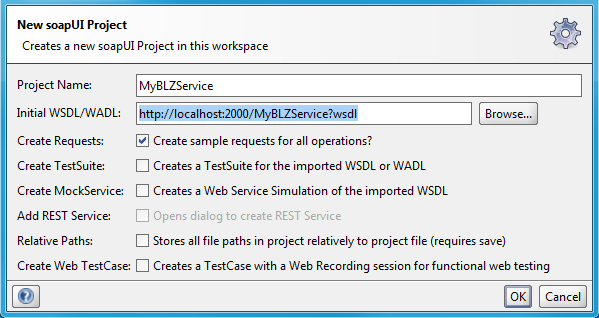
Figure4:
Expand the SOAP 1.1 binding and double-click Request1.
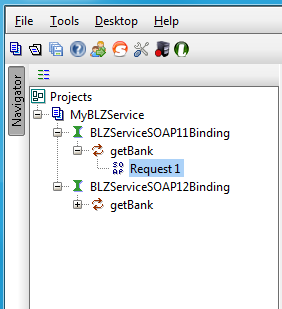
Figure5:
Fill in 37050198 as BLZ („BLZ“ is a routing transit number for German banks) into the request template.

Figure6:
Submit the request by clicking the green arrow. You will observe a successfully proxied SOAP response.
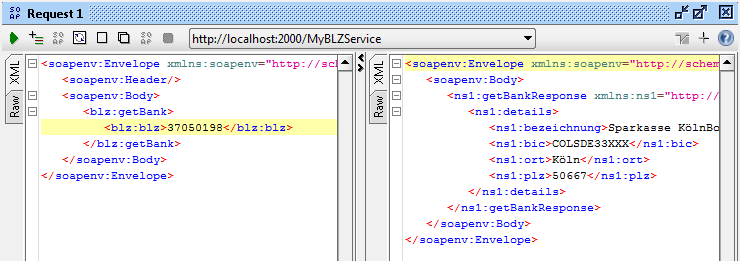
Figure7:
Now go to http://localhost:9000/admin/. Enter "admin" as username and "membrane" as password. You will see a wide range of usage statistics from the proxy. On the "Calls" tab, you can also inspect all recent HTTP messages that have been exchanged through the proxy.

Figure8:
3. Invalid Requests: Handling Backend Errors and Securing the Service
Now go back to soapUI. We will make the request structurally invalid: Add an element <foo /> to the request.

Figure9:
Resubmit your request (by clicking the green arrow). Observe the exception from the backend:

Figure10:
Now open Membrane's configuration file proxies.xml and add <soapStackTraceFilter /> as child element of <soapProxy>. The service proxy configuration will now look like this:
	<soapProxy port="2000" wsdl="http://www.thomas-bayer.com/axis2/services/BLZService?wsdl">
		<path>/MyBLZService</path>
		<soapStackTraceFilter />
	</soapProxy>
Save the configuration file. Your changes will be picked up by Membrane almost immediately. Go back to soapUI and resubmit your request (by clicking on the green arrow).

Figure11:
You will note that the backend's stacktrace was removed by the proxy. (For security reasons, one should never expose stack traces in public web services. <soapStackTraceFilter /> can help you accomplish that. Using Membrane, you can enforce this as a central policy, no matter how the backends are configured.)
Now also add <validator /> as another child element of <soapProxy>:
	<soapProxy port="2000" wsdl="http://www.thomas-bayer.com/axis2/services/BLZService?wsdl">
		<path>/MyBLZService</path>
		<soapStackTraceFilter />
		<validator />
	</soapProxy>
Save the configuration file.
Membrane will now perform XML Schema validation on all requests and responses for this service. Your invalid request will not be forwarded to the server. Instead you can observe this validation error:

Figure12:
Go to http://localhost:9000/admin/ and click on "BLZService". You will see a visualization of the service proxy for the BLZService. Note that under "SOAP Validator" you see that 1 out of 1 message has been invalid.
These numbers count (invalid) messages since startup or the last configuration change.
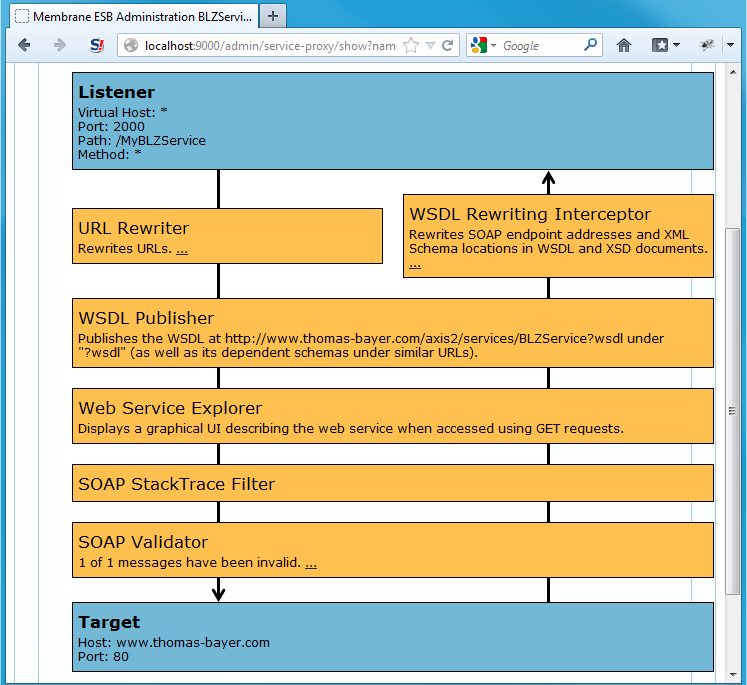
Figure13:
4. Making the proxy more informative
Now go back to the Web Service Explorer at http://localhost:2000/MyBLZService. Click on the "getBank" operation. You will see a sample request for this operation:
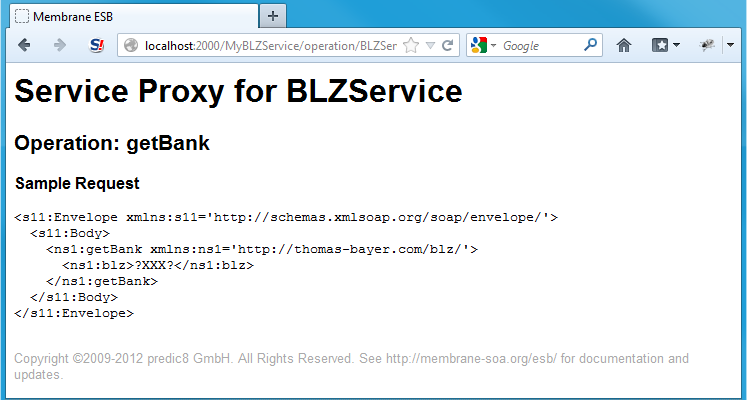
Figure14:
Now modify Membrane's configuration file proxies.xml once again: Add a new <serviceProxy> with an <index/>-Interceptor on port 2000 at the very bottom:
			<spring:beans xmlns="http://membrane-soa.org/proxies/1/"
				xmlns:spring="http://www.springframework.org/schema/beans"
				xmlns:xsi="http://www.w3.org/2001/XMLSchema-instance"
				xsi:schemaLocation="http://www.springframework.org/schema/beans http://www.springframework.org/schema/beans/spring-beans-3.0.xsd
								    http://membrane-soa.org/proxies/1/ http://membrane-soa.org/schemas/proxies-1.xsd">

				<router>

					<soapProxy port="2000" wsdl="http://www.thomas-bayer.com/axis2/services/BLZService?wsdl">
						<path>/MyBLZService</path>
						<soapStackTraceFilter/>
						<validator />
					</soapProxy>

					<serviceProxy port="9000">
						<basicAuthentication>
							<user name="admin" password="membrane" />
						</basicAuthentication>
						<adminConsole />
					</serviceProxy>

					<serviceProxy port="2000">
						<index />
					</serviceProxy>

				</router>

			</spring:beans>
below the exisiting <soapProxy port="2000"> element.
This will cause Membrane to display an overview page describing all configured services when accessing the root URL '/'.
Open http://localhost:2000/ in your browser.
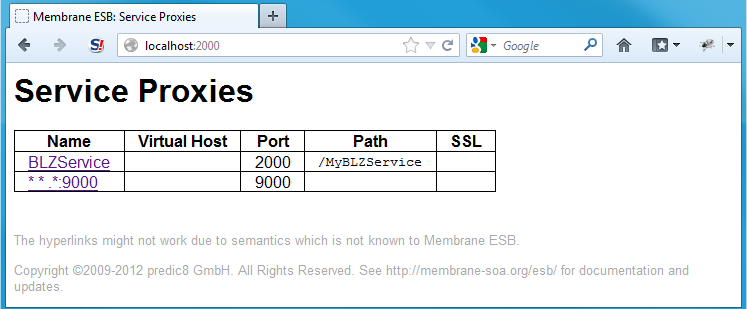
Figure15:
You will see a list of all services available though this Membrane instance.
5. Final comments
You have successfully used Membrane Service Proxy as a Web Service Proxy. This can help you with Web Service Integration, Service Virtualization, realization of an API Gateway and the Implementation of a Security Layer.
To continue reading about Membrane, you can go to the REST tutorial, read about exposing SOAP as REST or look at the other examples.